Thursday, December 26, 2013

Geospatial in the Technology Revolution

The January 2014 issue of Harpers has an intriguing article by Jeff Madrick, “The Anti-Economist - The Digital Revolution That Wasn’t”. 

Mr Madrick restates one of the Adam Smith’s principles; rising productivity is the source of the wealth of nations, in terms of technology. "Technologies that disrupt the labor force in one area eventually tend to benefit everyone because of increases in productivity.  Increases in the amount of goods and services delivered per hour of work generally lead to greater prosperity. Some jobs are eliminated but more and better paying jobs often replace them."

"Productivity growth actually started to fall well before the 2008 recession.  While some of the early hardware and software developments did create as much as 3% productivity gains, this did not last." 

At the heart of his thesis is that the new information companies, and in fact the new communication/information technology revolution does not create jobs.  We are four decades into the digital age and the economic benefits have not been manifested.

Granted this one view of the information age and its economic impact, but there are some interesting challenges for us in the geospatial information industry.  Geospatial technologies are part of the information age revolution. There are certainly new jobs in geospatial information that did not exist 5, 10, or 20 years ago.  If one of the trends in the geospatial industry is toward web based solutions and apps that can present answers to common questions, where are the high-end geospatial analysis professionals? As geospatial professionals are we really pushing forward and looking forward?  Are we being disruptive and contributing to productivity gains?  Some interesting challenges to consider as we move into the New Year.


The full article can be found here (it may require a login to get to the full article) http://harpers.org/archive/2014/01/
Thursday, December 19, 2013

Add WFS to ArcGIS Arc Map Canvas

Adding Web Feature Services (WFS) to ArcMap is a useful process if you want to find and add data that is not on ArcGIS Online or data that is only provided as a feature service and not a web service or REST service.  The WFS drawing and access may be slightly slower than other service access, so be aware of the number of features and the scale of the display.  The advantage is the data is provided as features and can be manipulated as features.

Adding a Parcel WFS with Parcel GML to ArcGIS desktop is a six step process.

Step 1 - Install Data Interoperability Functionality

The data interoperability extension has to be installed on your desktop but it does not have to be licensed.  To install the extension without purchasing it or going through the set up that requires a license requires the following steps.

Find the DVD with the ArcGIS Media.  This may be a virtual drive, if it is, mount the virtual drive to access the data interoperability set up.  When you open either the virtual drive or the physical media, a standard Esri install/set up screen displays.  Don’t use this route.  Open the drive in windows explorer and find the DataInterop folder.  In that folder is a set up application.  Run the set up application (not the set up configuration settings or the set up windows installer). Accept the licensing terms and select an installation folder, just like normal installs.

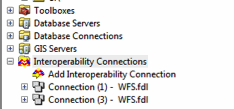
When you open Arc Catalogue the Interoperability Connections will appear in the list of potential connections as shown in Step 1 below.  There is no need to customize the extension since this activation will require a paid up license.

 Step 2 – Add WFS Service to Interoperability Connections

Open Arc Catalog and expand the Interoperability Connections.

Step 3 – Select Add Interoperability Connection

Select WFS from the format selection box and enter the service URL as shown in the Dataset window below.  This example is the federal land ownership WFS from the State of New Mexico.  One tip is to let the service determine the Reader Format.


Step 4 – Set Parameters

There are several parameters for the service that can be set by hand.  In this example the number of features was constrained to 30,000 to increase the speed performance.  The next two screens show the parameters.


Verify the connection by selecting the preview tab in Arc Catalogue.


Step 5– Rename the Connection (Optional)

The connection can be renamed so it can be easily identified when adding it to a Map Document.


Step 6 – Add Data to Map Document

In ArcMap Select Add Data.  Navigate to the Interoperability Connection in the Look in: pull down and double click on the feature class.  In this case the Fed-Lands-New-Mexico.


Select the Fed-Lands-New-Mexico.fdl (expand the database symbol to see the feature class).


Click on the Feature and then the Add button. The feature will index as it adds.

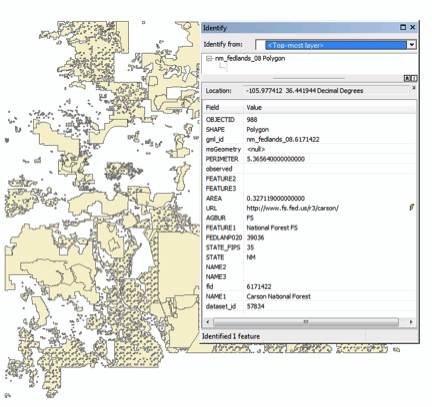
The Federal Lands GML features are now available on your active ArcGIS canvas.  If the ArcGIS map document is saved, each time the map document is opened the service will access the most current Fed Lands from New Mexico GML data available from the WFS.


The data from the WFS can be filtered by time stamp, by feature attribute, and symbolized, queried, and used in the desktop just as any other locally source data.